Wednesday 30 April 2014

Live Every Moment

Good evening everyone

I thought I would change direction today and make something other then a card.  I have had a MDF heart shape in my stash for a while which I have never got round to using, so I decided to give it a try.

Please be gentle with me, this is my first attempt at using MDF.


I have started with a MDF heart shape which I purchased from MDF Man.  Onto this, I have glued a piece of patterned digital paper, cut around the shape and lightly sanded to neaten the edges.

Next, I have used a flourish stamp which I have picked up as a freebie from Cards And Papercraft magazine and stamped around the edge of the heart with Momento Bahama Blue.  I have then stamped around the edge again using the same stamp, but this time with Perfect Medium and heat embossed it with Wow Clear Glitter embossing powder.  To finish the background of the heart, I have brushed micra powder around the edge.


Using the Spellbinders Decorative Labels Twenty-Eight, I have cut out the second largest from blue card stock.  The same process as the background has been used around the edges of this shape.

Next, I have stamped a sentiment from the same freebie set using Memento Bahama Blue and cut this out using the Spellbinders Delightful Circles die set.  Soft colour has been added in the same Bahama Blue and for sparkle and shimmer, glitter embossing powder and micra powder have both been added around the edge.

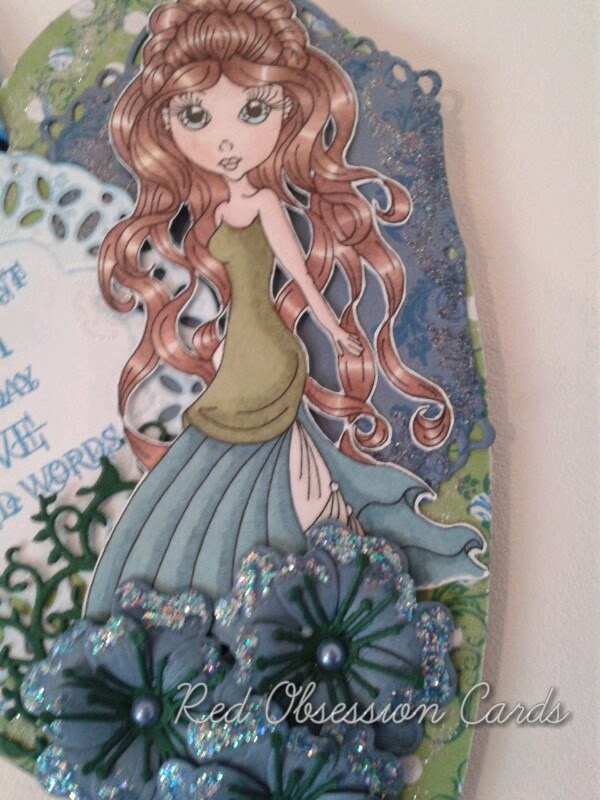
The digital stamp is a freebie from Cuddlebug Cuties.  I have coloured her using ProMarkers, cut her out and layered her using Pinflair glue.


From green card stock, I have cut a tree using the new Spellbinders D-Lites Delightful Tree die.  I have then made three flowers using the Spellbinders D-Lites Blooms Three.  The small and large petals have been cut from blue card stock, shaped and layered together.  The centre has been cut from green card stock and a blue flat back pearl has been added.

To finish, glitter glue has been added to the flowers and a blue ribbon for hanging the heart up.

I am entering this into the following challenges:

Desert Islands Crafts Challenge - Recipe (Hearts, Pearls, Anything But A Card)
Cute Card Thursday - Blue And Green
Creative Knockouts - Anything Goes
Pile It On - Rubber Stamping
One Stitch At A Time - Anything Goes
Through The Craft Room Door - Anything Goes
Inky Chicks - From The Heart

That's all for now.

Teresa
x

Monday 28 April 2014

Love To Create Guest Designer

Good afternoon


I have all ways loved crafting but it has been something that I kept to myself until a few months ago.  So imagine my delight at being asked to be this weeks Guest Designer on the Love To Create Challenge Blog.

The theme is Pearls & Bling and the challenge sponsers are The Stamping Chef and Flourish With A Bling.

I have chosen the colours of pink and green which I think gives a spring feeling to the card and I have used a digital stamp from The Stamping Chef called Red Carpet Reanne.


I have started with a square piece of white card stock and embossed it using the Die'sire Embossalicious Regency Swirl embossing folder.  Next I have added some subtle colour using the Memento Angel Pink ink pad and some pearls to the corners using pink Cosmic Shimmer PVA glue.

I have then layered onto this a piece of pink patterned digital paper and a panel of green patterned digital paper.  Around the join of the two papers, I have added some pink ribbon.


Using the Spellbinders Decorative Labels Twenty-Eight die set, I have cut out the second largest from white card stock with a double sided adhesive sheet attached.  This has then been embossed using the Regency Swirl embossing folder and to finish, loose glitter has been added to give it lots of sparkle.

The digital stamp has been coloured using ProMarkers, cut out and layered onto the glitter shape using Pinflair glue to add dimension.

Two flowers have been made using the Spellbinders D-Lites Blooms Three.  The large and small petals have been cut from pink Centura Pearl and the centre has been cut from white card back with double sided adhesive and again, loose glitter has been added.  The flowers have been finished with white flat back pearls.


To add interest, I have used a pink pearl flourish from Flourish With A Bling and a bow made from the same pink ribbon.

The finish, a "Happy Birthday" sentiment has been cut from pink Centura Pearl using the Whimsy Stamps Birthday Sentimentables die set.


I would also like to this card into the following challenges:

Nutcrafters - Go Girly
In The Pink - Digital Delight
Craftitude - Anything Goes / Spring Or Easter
Sister Act Card Challenge - Anything Goes
Delicious Doodles Challenges - Pink And Girly
The Stamping Chef - Anything Goes
Crafty Catz - Anything Goes
Brown Sugar Challenge Blog - Anything Goes
613 Avenue Create - Anything Goes
Crafting From The Heart - Anything Goes
Whoopsi Daisy Challenge - Hand Coloured Image
Creative Moments - Anything Goes / Spring
Scribble And Scrap Blog - Anything Goes

That's all for now.

Teresa
x

Sunday 27 April 2014

Time To Relax

Good evening everyone

I hope everyone has had a good weekend and got lots of crafting done.  I had a busy day at work yesterday and today has been spent trying to catch up on the housework.  I get so obsessed with crafting that I sometimes forget about the house, does anyone else do this?

Anyway, tonight I have gone for a very quick, clean and simple card.


I have taken a piece of white card stock and embossed it using the Die'sire Embossalicious Grande Dots embossing folder.  Soft colour has been added to this using the Memento Bahama Blue ink pad.  This has then been layered onto blue card stock leaving a small border around the outside.

Next, I have taken a panel of white card and added a double sided adhesive sheet to it.  This has been embossed using the Die'sire Embossalicious Regency Swirls embossing folder and loose glitter added to create a glitter card.  Again this has been layered onto blue card and placed on the bottom half of the background.


The digital stamp is from Sherri Baldy.  I have coloured her using ProMarkers and added some Glossy Accents to the bubbles.  I have then cut her out using a Spellbinders circle die.

Using my Cameo Silhouette and a free cutting file from Birds Cards, I have cut out a decorative circle from blue card.  The digital stamp has then been layered onto the centre of this circle.


Some blue glitter ribbon has been wrapped around the card and a bow made from the same ribbon has been placed at the bottom of the circle.  Blue flat back pearls have been added to the top corners of the background.

To finish the card, I have printed from my computer the sentiment "Mum Take Time To Relax" and layered this onto the bottom right hand corner of the card.

I am entering this card into the following challenges:

Emergency Crafters - Polka Dots
Artistic Inspirations - CAS / Anything Goes
Love To Create Challenge Blog - Monochromatic With A Twist - Ribbon
Eureka Stamps - Clean And Simple
Tuesday Throwdown - Lots Of Sparkle
Lou's sketch challenge 244
Crafting With Dragonflies Challenge Blog - Mother's Day / Special Lady
Simon Wednesday Challenge Blog - Keep It Clean And Simple

That's all for now.

Teresa
x

Thursday 24 April 2014

Let's Bake

Good evening everyone

Today's card in made in the colours of blue and lilac with a hint of yellow in the image.  I love this digital stamp, it is so cute and has two girls to colour.


I have randomly stamps a pattern onto white card stock using Perfect Medium and heat embossed with Cosmic Shimmer Arctic Lake Lustre embossing powder.  Next I have run the card through the Die'sire Embossalicious Grande Dots embossing folder and added a subtle shading using a blue ink pad.

Two panels have been cut from lilac Glitter card and layered top and bottom of the background.  Then I have taken a smaller piece of lilac Centura Pearl card stock and embossed it using a Spellbinders hearts embossing folder.  To finish the background, I have cut a triangle shape from white card stock and embossed with a different embossing folder.  I'm not sure what this one is called.


The digital stamp is from Sherri Baldy.  I have colour them using ProMarkers, cut them out and layered them onto the background using Pinflair glue to add dimension.

The bow has been made by taking a piece of spiders web and trying a knot in the centre.  I have added a string of glitter beads and a gemstone to the centre of the bow.


To finish, I have added blue flat back pearls to each of the corners.

I am entering this card into the following challenges:

Inky Chicks - Shabby Chic
613 Avenue Create - Anything Goes
Through The Purple Haze Challenges - Creativity Strikes
Creative Inspirations - Cute Characters
Addicted To Stamps And More - Make Your Mark
The Stamping Chef - Anything Goes

That's all for now.

Teresa
x

Wednesday 23 April 2014

Glittering Butterflies

Good evening all

Well a day from work today at long last, but not from housework.  Three loads of washing done and still more sitting in the basket.  It's going to take forever to iron it all.  It can wait until tomorrow and it's now time to relax and craft.

This card has been made around a sentiment rather then an image and is very girly in pink.


I have embossed a square piece of white card stock using the Die'sire Embossalicious Ornate Butterflies embossing folder and added subtle colouring using the Memento Angel Pink ink pad.  This has been layered onto pink card stock leaving a small border around the edge.  I have then taken placed a panel of pink glitter card across the background.


Using my Cameo Silhouette and a free cutting file from Birds Cards, I have cut out a lacey circle from pink card.  I have also cut out a smaller pink circle and white circle.

The sentiment is a free one which I have had on my computer for about 3 years, I'm not sure where I picked it up from.  It has been printed onto smooth white card and the same pink ink pad used to add a littler colour.

The smaller white circle has been embossed and tiny pink gemstones added.


From the same pink glitter card, I have cut one large butterfly using the Marianne Design Creatables Butterfly 2 die.  Gemstones have been added down the middle of the butterfly for that extra bling.

To finish the card, I have made a bow from pink ribbon and placed a small butterfly cut from pink glitter card using the Memory Box Pippe Butterfly die.


I am entering this card into the following challenges:

DRS Designs Rubber Stamps - I Get Around
Crafty Catz - B Is For (Butterflies)
Simply Create Too - No Stamped Image
My Time To Craft - Up, Up & Away
The Corrosive Challenge Blog - Pretty Pastels
Totally Gorjuss - Die Cuts
One Stitch At A Time - Favourite Things (Butterflies)
The Crazy Challenge - Spring Is Here
Craft Your Passion Challenge - Pretty Pastels
Through The Craft Room Door - Anything Goes
Crafty Creations Challenges - White + 1 Other Colour
Crafty Calender Challenge - Things With Wings
Scrapbook Blessings Club - Anything Goes
The Sisterhood Of Crafters - Things With Wings
Scrap Creations - Anything Goes
Let's Craft And Create - Punches And Dies
Butterfly Challenge - Glamourous Butterflies

That's all for now.

Teresa
x

Tuesday 22 April 2014

Red, White And Blue

Good evening all

A very quick card tonight just to help me relax after a very busy few days at work.  The colours are red, white and blue and it is a birthday card for a Granddaughter.


I have taken two different pieces of patterned digital paper and layered them onto red card stock leaving a small border around the outside.  Next I have drawn stitching around the outside of the background using a blue fine liner pen.  Red ribbon has also been wrapped around the centre of the background.


The digital stamp is from Sherri Baldy and I have coloured it using ProMarkers.  The image has been layered onto red card stock and matching stitching has been drawn around the outside.  To add a little sparkle, tiny blue gemstones have been placed in groups of three.


For the flowers I have used the Spellbinders D-Lites Blooms Three which have been cut from red card stock, shaped and layered.  A blue gemstones has been added to the centre of each flower.  I have also added leaves using the Heartfelt Creations Sweet Juliet die.

To finish off the flowers, some blue buds from Live And Love Crafts have also been added.


Lastly, using the Tattered Lace Family Sentiments die set, I have cut Granddaughter from red card stock and placed it in the top left hand corner of the card.

I am entering this card into the following challenges:

As You Like It Challenge - Stitching (I love stitching on cards, but I do not and can not use a sewing machine, so faux stitching is my favourite)
Creative Knockouts - Furry Or Feathery Friends
The ABC Challenge - J Is For Just As You Like
Crafting From The Heart - Anything Goes
Fan-Tastic Tuesday - Anything Goes

That's all for now.

Teresa
x

Monday 21 April 2014

Vintage Pink

Good evening all

Very quick post tonight, I have got an early start for work tomorrow so I have to go to bed.

The card I have made tonight has lots of pink and lots of flowers, so is very girly.


I have started with a square piece of white card stock and embossed it using a Spellbinders heart embossing folder.  Next I have distressed the edges of the card and added colour using the memento Angel Pink ink pad.

To the left of the background, I have placed a light pink panel which has also been embossed using the Die'sire Embossalicious Regency Swirls embossing folder.  The edges of this panel have also been distressed.

Using my Cameo Silhouette, I have cut an oval from white card stock, distressed the edge in the same way as the background and added colour using the same ink pad.


The image is from Saturated Canary.  I have colour her using ProMarkers, cut her out and layered her onto the oval shape.  To finish this, I have added pink pearls using the Cosmic Shimmer Vintage Pink PVA glue.

Using my Silhouette, I have cut out seven rolled flowers using a free cutting file from Birds Cards.  To these flowers, I have added some sparkle using the Twinklets Diamond Dust.

I have also added same swirly leaves using the Spellbinders D-Lites Sprigs which have been cut from green Centura Pearl.


The finished background has been layered onto white card using foam tape for dimension and a border of pink pearls around the outside using the PVA glue.

I am entering this card into the following challenges:

Fan-Tastic Tuesday - Use Some Pastel Colours
Tuesday Throwdown - Vintage / Shabby Chic
{PIN}spriational Challenges - Photo Inspiration
http://www.pinterest.com/pin/141581982009932210/
Creative Inspirations - Lots Of Layers
Addicted To Stamps And More - Anything Goes
QKR Stampede - Spring Celebrations

That's all for now.

Teresa
x

Sunday 20 April 2014

White Flowers

Good afternoon all

Hope anyone is having a great Easter Sunday.  Mine has been a very relaxing day with a little bit of crafting thrown in.

For my card today, I have decided to go with a white theme with flowers and glitter.


I have taken a square piece of plain white card stock and embossed with using the Die'sire Embossalicious Ornate Butterflies embossing folder.  This has been layered onto a second piece of white card which has a pearl border around the edge made from the Cosmic Shimmer white PVA glue.

Then using my Cameo Silhouette, I have cut out a free Lacey Circle from Birds Cards from white card.  I have also cut a circle to fit the centre.

I have used a floral stamp from Crafty Individuals and stamped with Perfect Medium onto the circle.  This has then been heat embossed with a clear embossing powder.  Once cool, I have brushed over a warm tint micra powder and then heat set it into the clear embossing powder.


I have printed the sentiment "Be like the flowers, turn your face to the sun" from my computer and then cut it out using the Spellbinders Reflective Moment die set.

Two different flowers have been included on this card.  The first one is the Spellbinders D-Lites Blooms Four.  Two large petals and one small petal has been cut from white card, shaped and layered together.  The second is the Spellbinders D-Lites Blooms One.  All three sizes have been cut out once and layered together.  Flat back pearls have been added to the centre of all five flowers.  I have also cut out the Spellbinders D-Lites Tiger Lilies die from white card and placed this behind the flowers.

I have also added two white flower buds from Live And Love Crafts to give a little extra detail.


To finish, I have added a white ribbon plait and sparkle to the flowers using Twinkets Diamond Dust.

I am entering this card into the following challenges:

The Sisterhood Of Crafters - White On White
Artistic Inspirations - Monochrome Anything Goes
Crafty Sentiments Designs - Use Lots Of White
Fab 'n' Funky Challenges - Flower Power
The Paper Shelter - Spring Is Here
4 Crafty Chicks - Sentiment Only
A Creative Romance - Spring Flowers
Really Reasonable Ribbon - Monochromatic And Ribbon
Crafty Cardmakers And More - A Floral Profusion
Pile It On - No DP (Make Your Own)
Crafting Musketeers - Monochrome
Lexi's Creations - Focus On The Sentiment
Ladybug Crafts - White On White

That's all for now.

Teresa
x

Friday 18 April 2014

Simple Sunshine

Good evening all

What a busy day, Easter eggs had completely sold out by lunch time today and for once, I had brought mine early.  It was definitely a day for fish, we had queues at the fish counter all day.  I'm expecting another busy today tomorrow and then I can relax and craft on Sunday.

I started this card last night and just managed to finish it tonight before I full asleep with exhaustion.


I have taken a square piece of white card stock and embossed it using the Die'sire Embossalicious Flower Power embossing folder.  Next I have added soft yellow to this using the Tim Holtz Distress ink Mustard Seed ink pad.  This has then been layered onto brown Centura Pearl card stock.

Using the Spellbinder A2 Bracket Borders Two die set, I have cut a border into brown Centura Pearl and white card stock.  Using the same ink pad, I have added colour to the white card to match the background and layered them both together.


The digital stamp is from Sherri Baldy.  I have coloured her using ProMarkers, cut her out and layered her onto the background using PinFlair glue.


Brown stitched ribbon has been wrapped around the background and I have made a bow to match adding yellow ribbon around the centre along with a double heart charm.


A Happy Birthday sentiment has been cut from the same brown Centura Pearl using the Whimsy Stamps Birthday Sentimentables die.

To finish, I have added brown flat back pearls to two of the corners.

I am entering this card into the following challenges:

Totally Gorjuss - Charming
Incy Wincy Designs Challenge - Clean And Simple
My Besties Aussie Challenge - Use Yellow And Brown
The Stamping Chef - Anything Goes
Crafty Ribbons Challenge - Anything Goes With Ribbon
Moving Along With The Times - A Card Containing The Work Happy
Sister Act Card Challenge - Anything Goes
My Besties Norge - Ribbon And / Or Lace
My Craft Creations - Anything Goes
Scrapbook Stamp Society Challenge Blog - Use Yellow On Your Card
Besties Challenge - Anything Goes
Ruby's Rainbow - Ladies
Craft-Dee BowZ - Anything Goes
Crafty Girls Challenges - Anything Goes

That's all for now.

Teresa
x

Thursday 17 April 2014

Easter Chicks

Good afternoon everyone

I hope everyone is looking forward to the Easter weekend, unfortunately, I am working most of it.  Do have Sunday off as we don't open on Easter Sunday.  I don't know about you, but I think that every Sunday should be left as a family day and shops shouldn't be allowed to open.

Anyway, today I have made an Easter themed card in pinks and yellows.


I have started with a square piece of patterned digital paper and layered this onto pink card stock leaving a little border around the outside.

Next, using the Spellbinders A2 Bracket Borders Two, I have cut a border into the top and bottom of pink card stock.  Again, using the same die set, I have cut a border into the top and bottom white card stock.  This has then been embossed using the Die'sire Embossalicious Ornate Butteries embossing folder.  Soft colour has been added using the Tim Holtz Distress Ink Mustard Seed ink pad.

These two panels have been layered together and placed onto the background.


I have then cut out two circles, one in pink and white in white, using a Spellbinders circle die.  The same ink pad has been used to add colour to the white circle.

The digital stamp is from Sassy Studio Designs.  I have coloured her in using ProMarkers, cut her out and layered her onto the circles using Pinflair glue to give dimension.

Tiny pink flat back gemstones have been added in groups of three to give a little bling.


The flower has been made using the Spellbinders D-Lites Blooms Three.  I have cut one large and one small petal from yellow Centura Pearl and one centre from pink card stock.  These have been shaped and layered together to form the flower.

The foliage around the flower has been made using the Spellbinders D-Lites Corner Sprigs.  I have cut about six of these from pink card stock and layered them around the flower.


To finish the card, I have added a small cut from the same pink card, using the Memory Box Pippi Butterfly die.  Matching tiny gemstones have been added to the centre of the butterfly.

I am entering this card into the following challenges:

Jo's Scrap Shack - Happy Easter
Sketch Saturday - Sketch
Allsorts Challenge Blog - Spring Blossoms
QKR Stampede - Easter
Crafting From The Heart - Anything Goes / Use Yellow
Eureka Stamps - Happy Easter
Scrap Creations - Easter
Craft Your Passion Challenges - Bunnies, Chicks And Eggs
Passion For ProMarkers - All Creatures Great And Small
Alphabet Challenge Blog - E For Easter
Jellypark Challenges - Happy Easter
Craftin Desert Diva's - Colour Inspiration
Oldie But A Goodie Challenge - It's Easter (Digi is more then 6 months old)
Just For Fun - Easter

That's all for now.

Teresa
x

Wednesday 16 April 2014

Hip Mum

Good evening

For my card today, I have gone with the colours of black, white and green and chosen the theme of Mum.  I have left it neutral so it can be using for Birthday, Mother's Day or just to say I love you Mum.


I have started with a square piece of patterned digital paper and layered it onto black card stock leaving a smaller border around the edge.  Using the Spellbinders A2 Bracket Borders Two, I have cut a panel from contrasting patterned digital paper, again layering it onto black card stock.


Using the Spellbinders Decorative Labels Twenty-Eight, I have cut the largest from black card stock and then added white card stock to the centre.

The digital stamp is from Sherri Baldy.  I have coloured her in using ProMarkers, cut her out and layered her using Pinflair glue to give dimension.


The flowers have been made using a Tattered Lace flower die set.  I have cut three of the middle sized petals from green card stock and shaped them to form a bud, next I have glued the bud onto the decorative petals also cut from green card stock.


I piece of upholstery cording has been wrapped around the background and onto this, I have added a sentiment using the smallest die from the Spellbinders A2 Tranquil Moments and the Tattered Lace Family Sentiments die set.

To finish, I have added flat back pearls to each corner and pearls to the image background using Cosmic Shimmer white PVA glue.

I am entering this card into the following challenges:

DRS Designs Rubber Stamps - Pop Goes 1 Color
Southern Girls Challenge - Earn Your Stripes
Hobby Cutz Challenges - Bingo (Flowers, Stamp, Die Cuts)
Through The Craft Room Door - Anything Goes

That's all for now.

Teresa
x